

Tutorial
This tutorial will teach you everything you need to know about Weaver.
What is Weaver?
Weaver is a pure-Java, XML programmed Controller component for developing Model View Controller (MVC) structured, servlet based, Web applications.
First we'll look at the Model View Controller architecture and then we'll consider how this relates to Weaver.
The Model View Controller Architecture
The Model View Controller (MVC) architecture divides an application in to three components.
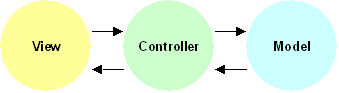
Referring to the above figure these are:
- Model - The Model is the computational part of your application; the bit that does all of the real work. The Model may well be further subdivided in to additional layers.
- View - The View component is the presentation of your application to the user. So in the case of a Web based application it is what the user sees in their browser.
- Controller - The Controller links and separates the Model and the View. The Controller decides how to act upon Model components as a result of user interactions with the View and (in the case of a web application) typically causes a new view (web page) to be displayed.
This separation decouples the View from the Model, so any given application may have multiple user interfaces and the user interface and the Model may be developed and may be changed independently.
Consider a hypothetical Internet search engine. The View component, developed using JSP technology, displays a search form. The user enters their query and submits the form. The Controller component examines the submission, determines that a search action is indicated and extracts the query string. It calls the Model, passing the search query, in order to actually have the search executed. Once the Model has done its job, a set of search results are returned to the Controller which then forwards to a JSP page to render the hitlist in the user's browser.
Next we'll consider Weaver's role in the MVC architecture.
Where Does Weaver Fit In?
Weaver is an implementation of a Controller component for Web applications using servlet technology. The following figure shows Weaver in relation to the MVC architecture:
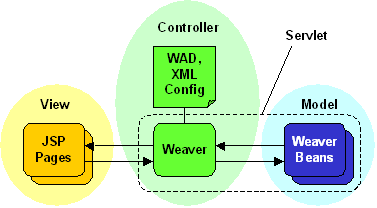
In the figure the View component is implemented using JSP pages - this is typical but is not necessarily the case, any servlet-friendly View technology may be used.
The Model component is implemented by Weaver Beans (W-Beans). A W-Bean is a Java class that implements a particular interface. The W-Bean interface allows information to be passed to and from the View and the Controller independently of the fact that the W-Bean is running in a servlet. Typically W-Beans are thin classes that call Business Layer objects to do the real work of the application.
Weaver itself, implements the Controller component. Weaver reacts to Web page submissions, by calling W-Beans in a manner programmed by an XML configuration file; this file is known as the Weaver Application Definition (WAD) file. The XML tag vocabulary used in the WAD file allows you to control how given events are processed, more of this later.
Now we'll take a brief look at some of the features of Weaver that might make it an attractive choice for the development of your application.
- Weaver is programmed via a simple but powerful XML syntax whose elements are modeled after those provided by JSTL. This means that you can reuse much of your JSTL experience.
- An Expression Language (EL) syntax that is identical to that of JSP 2.0 is used by Weaver tags to control the processing of user actions.
- The tag vocabulary itself is easily extensible (see the Tag HOWTO).
- Any servlet-friendly View technology may be used e.g. JSP.
- Model functionality is easily added via the implementation of a simple Java W-Bean interface.
- Any application based on Weaver comes with an Administrative Console for free. This allows you to monitor, to configure and to diagnose faults in running applications (see Console Docs).
- Weaver has simple and flexible authentication and error handling mechanisms.
- An application may be composed of multiple cooperating servlets.
- Weaver will run in any suitable servlet container while completely insulating the developer from the fact that a servlet container is being used at all.
- Rapid application development is supported via automatic reloading triggered by the modification of the WAD file or other configuration files. This greatly reduces application development time.
- Weaver has a very low execution overhead.
The tutorial will now proceed by exploring the files contained in the distribution.
Examining the Distribution
If you have not yet downloaded Weaver now is the time to do it, please see the Downloading and Installing guide.
Both the binary distribution and the installer contain the same files layed out as follows:
- license.txt - License agreement.
- README.txt - Readme file.
- docs - Documentation, start by opening docs/index.html.
-
core - Weaver's kernel.
- lib - The lib directory contains the most important file in the distribution, weaver-starter-app.war - the starter application. This is a fully working, deployable empty Weaver application (including the Administrative Console). This is the usual starting point for developing new Weaver applications.
- src - Weaver's source code.
-
taglet - A java doc taglet that can be used to document Weaver beans. Click here for
more.
- lib - Contains the compiled taglet as wbean-param-taglet.jar.
- src - The taglet's source code.
-
wbeans - Weaver beans packages. Click here for more.
- xml - W-Beans for processing XML.
- lib - Contains the copile xml W-Beans in xml-wbeans.jar.
- src - The xml W-Bean's source code.
In the following sections of the tutorial we will deploy the starter application, discuss its contents and examine the structure of a Weaver application.
Deploying the Starter Application
Before proceeding you should have installed a JDK (1.4 or later) and Tomcat (5.0.19 or later) or equivalent. I will assume that you are using Tomcat listening on port 8080 (the default).
Copy the starter WAR file from core/lib/weaver-starter-app.war in to Tomcat's webapps directory and start Tomcat. You should see Weaver's output to standard error along the lines of:
Now open a Web browser to:
You should see something like the following in your browser:

Now have a look at he Administrative Console - either follow the link on the current page or just tag admin on the end of the URL:
Should any of the functions on the Console be unclear then either consult the built in help or see the Console Documentation.
In the next section we will look at the file/directory structure of a typical Weaver application.
Structure of a Weaver Application
In this section we'll look at the file structure of a typical Weaver application using the starter application as an example. So either unpack the starter war, or if like Tomcat 5, your servlet container unpacks deployed wars take a look at the version of the starter app you have already deployed.
The above structure will be familiar to any servlet developer, but we'll run through the function of the most important files and directories from top to bottom:
- admin-static - This contains those "static" files used by the Administrative Console that must be directly downloadable by the user's browser; this amounts to image files and CSS. You will often create a similar directory to hold such resources for your application.
- META-INFO - The war file's manifest.
- WEB-INF - The servlet's WEB-INF directory, files contained in WEB-INF are not directly accessible to the user's browser.
- web.xml - The web application's deployment descriptor, more of this later.
- admin - The Administrative Console. The administrative console is itself a Weaver application, it may be informative to explore its source code and configuration.
- conf - Configuration files for the Administrative Console. Most importantly conf contains servlet.properties - which holds configuration settings for the servlet, and wad.xml - which programs the behavior of the Weaver controller in response to user events.
- jsp - The JSP pages that make up the Administrative Console.
-
application
- conf
- application.properties - global configuration.
- tagmap.xml - a mapping of tag names to implementation classes. See the Tag HOWTO.
- logs - default logs directory.
- uploads - default file uploads temporary directory.
- lib - jar files used by your application.
- myapp - This is the bare-bones empty Weaver application. You will see that the directory structure is identical to that of the admin console. This is no accident as it contains the files required by all Weaver applications.
Next we'll go on to look at the contents of the WAD file and at Weaver Beans.
Overview of the Weaver Application Definition File
The Weaver Application Definition or WAD file has already been introduced as the XML file that programs the behaviour of Weaver. In this section we'll look in a little more detail at its contents.
The following shows the "top-level" elements in the WAD file:
We will now consider each of these top-level elements in turn.
The information, load-beans and load-functions elements are called declaration tags, they are used only as the application is loaded.
- information - The information tag takes attributes that describe your application e.g. version, name and release date.
- load-beans - Declares and loads the Weaver Beans that implement the Model component of your application.
- load-functions - Declares and loads functions that are used to extend the functionality offered by the Expression Language (EL). The EL is used by other tags to, for example, take decisions about the processing of user events.
All of the other tags introduce sections of the WAD file that contain tags that are executed as your application is run, they are called execution tags.
- application - The contents of the application tag relate to application startup and shutdown. Typically the application tag is used to initialise global resources at startup and then uninitialise them at application close down.
- init - Called as the application is initialised.
- destroy - Called as the application is closed down.
- session - The contents of the session tag relate to user-browser session creation and destruction. Typically the session tag is used to initialise resources that are session-specific when the session is created and to uninitialise them on session closedown.
- init - Called as each session is created.
- destroy - Called as each session is destroyed (including as a result of session timeout).
- time-out - Called when an action is taken that requires a session but no session exists, this is typically the result of a user executing an action from a browser which contains a session that has been timed out.
- main - the contents of the main section are called as your application executes. It is the main section that decides how to handle user events.
- dispatch - Called to handle user actions in the normal process of executing your application. This is the core of the WAD file.
- default - Called when a user action could not be handled in the dispatch section.
- security - Called when user authentication is required.
So What Exactly Goes on in the WAD file
As an introduction we will consider a very simple voting application.
The application displays a JSP page which poses the question "Do you like Weaver?", to which you may answer "yes" or "no". The application echoes a message appropriate to your selection. Using Weaver here is of course purely illustrative!
We can develop this application based on the starter app. You could, should you wish, edit the following changes directly in to the starter app you deployed earlier.
First we need to create our JSP pages. We will create our pages under the myapp/jsp directory
We'll write a JSP page called welcome.jsp as follows:
I have kept the above absolutely as simple as possible. There should be no surprises here for anyone who as developed an application with a web-based front end.
The only interesting parts of the above are the values supplied by the form. The event field is used to indicate the action taken by the user - voting in this case.
The opinion radio buttons allow the user to vote yes or no.
Now we'll create a JSP to echo a response to the user, call it thanks.jsp.
This is getting a little more interesting, but again no surprises to anyone who has developed JSP 2.0 pages. The page simply uses the c:out JSTL tag to display the result of evaluating the Expression Language (EL) statement ${requestScope.response} - that is the value of the request scoped attribute called response.
If you are not familiar with JSP 2, JSTL or the EL used in JSP 2 then there are a whole bunch of ideas to get to grips with in this simple page. None of this is Weaver per se and you may decide not to use JSPs at all in your application - but as Weaver uses the same EL as JSP 2.0 and the execution tags in the WAD file are modeled after those in JSTL, relevant experience is easily transferable.
Next we will take a quick aside to introduce the EL before we look inside the WAD file.
The Expression Language - A Quick Aside
The Expression Language (EL) used by Weaver is identical in syntax and semantics to that used in JSP 2.0. A full discussion of the EL is beyond the scope of this document, the following are recommended tutorials:
- The EL Section of Sun's J2EE tutorial.
- The article in Enterprise Java Technologies Tech Tips for January 26, 2004.
For the definitive reference you should see:
- The JSP 2 Specification.
Weaver has its own set of scopes in the EL. Some of these are shared with the EL as used in JSP pages others are unique either to Weaver or to JSP pages. Values stored in a shared context either by Weaver or in JSP pages are available to both. Most of the scopes used by Weaver are introduced in this tutorial.
When a value is referred to in the EL without a scope e.g.
Weaver's scopes are searched for the value in a particular order. For a definition of this order and for a comprehensive list of scopes please see the Reference Manual.
The Reference Manual also shows which servlet API objects are used to store the values in each scope. This information is essential if you are using a View technology other than JSP with the EL.
An Overview of the WAD File
OK now we are ready to take a look at the Weaver Application Definition (WAD) file. Remember it is the WAD file that defines the behavior of Weaver.
If you modify the WAD file of a running application (and you have reloading turned on) your application will be automatically reloaded by Weaver - this should be confirmed by log messages along the lines of the following:
Now let's examine our modifications to the WAD file.
You may have noticed that the tags added to the dispatch section look a lot like some JSTL tags. They perform the same functions as their JSTL namesakes and take similar attributes. Where possible this approach has been adopted throughout.
The if tag is like a Java if keyword. Its test attribute is evaluated according to the EL, then if the result is true the contents of the if tag are executed. In our example we are testing to see if the value of the event parameter is "vote". Two things to notice here - whenever an EL expression is used it is wrapped by ${ and }, and parameters supplied from Web pages, whether via a URL or via form submissions, are referred to using the param prefix.
The choose tag is like a Java switch statement. At most one of several alternatives are executed. The alternatives are declared as when tags - each has an associated test attribute containing an EL statement. The contents of the first when tag whose test attribute evaluates to true is executed. If none of the tests evaluate to true then the contents of the optional otherwise tag are executed.
Our choose tag contains when tags that test whether the vote parameter has the value "yes" or "no". The set tag is used to store an appropriate value in the request scoped response attribute.
The forward tag is then used to cause thanks.jsp to be sent to the user's browser. thanks.jsp pulls out the value of the response attribute and displays it to the user.
The default section of the WAD file is executed should a web page submission not be handled in dispatch section. So as the application executes and you pull up http://localhost:8080/weaver-starter-app/myapp/ initially the event parameter is not specified and so the default section is executed and greeting.jsp page is displayed.
If you wish you, you can watch Weaver processing incoming events by going to the Administrative Console and turning on debug logging.
A complete list of the standard tags and the scopes used by Weaver may be found in the Reference Manual and a description of how to add tags of your own may be found in the Tag HOWTO.
In the next section of the tutorial we'll see how to start calling Model functionality from the WAD file via W-Beans.
Adding a Weaver Bean
Weaver Beans (W-Beans) provide the route via which you integrate and call Model code.
A W-Bean is a class that conforms to the com.oldlight.weaver.clientbinding.WeaverBean interface:
The clientbinding and context packages contain most of the Weaver classes you will need with when developing your application - take a look at the javadoc.
When a Weaver Bean is called from the WAD file its handle method is executed. As you can see handle takes a single parameter called context of type WeaverExecutionContext and throws WeaverClientException.
The context parameter is your W-Bean's interface to Weaver - amongst other functions it provides you with access to the scoped parameters and attributes that may have been passed through from the View or may have been set elsewhere.
Should an error occur during processing in one of your W-Beans you should indicate this to Weaver by throwing a WeaverClientException.
Now we'll look at a simple W-Bean and how it is called from the WAD file.
We'll create a very simple bean that does pretty much what we did previously to illustrate some of the tags used in the WAD file - that is to supply a response to the user based on their vote.
Of course, your beans will do whatever is needed for your application. Typically W-Beans form a thin layer and the real work is done by calling down to underlying business objects.
Examining our bean; the first thing that happens in the handle method is that the value of three "bean context" attributes are read - we'll see where they come from shortly. The first two - called var and scope - are commonly used to refer to the name of a variable that is to be set and the scope in which the variable is to be be set, respectively. This usage is consistent with that of JSTL. The third attribute, called opinion passes in the user's vote.
The if statement acts on the value of opinion and sets message appropriately.
Finally the resulting message is stored in an attribute for later display in a JSP page. The use of the WeaverAttributeUtil class should be noted here. You should always use this utility in circumstances when you wish to set an attribute in this fashion as it looks after handling the different possible values for the scope parameter in a consistent manner.
Now let's look again at the WAD file. Before a W-Bean may be called from the WAD file it must be declared in the load-beans section using the bean tag:
The bean tag takes a name and a class attribute. The name is simply an alias that will be used elsewhere in the WAD file to refer to the bean. The class is the fully qualified name of your W-Bean Java class.
So we have declared the bean - how about calling it? W-Beans are invoked using the call tag:
You can see the call tag invoking our vote W-Bean. The param subtags are used to explicitly pass values to the bean via the BeanContext. You may be asking why bother when the bean has direct access to the attributes set in the View and the parameters supplied with the GET/POST. Adding this level of indirection is good practice as it further decouples the View from the rest of the application, and allows the bean to be reused with parameters coming from different sources. If you make a change to the View you just need to change the WAD file to still have the correct values fed through to your W-Bean. The same arguments hold for passing in the name and scope of the attribute to store a result in - rather than just having the code "know" a hardcoded attribute name in which a bean will store its result.
In the context of the rest of the WAD file - without changing our JSPs we may change the dispatch section as follows:
We test to see if the action taken was a voting action. If it was then we call our new W-Bean passing in the details of the attribute we'd like the result storing in and the opinion expressed by the user.
So far we have covered the basics - next we'll take a look at session and application initialisation and destruction.
The Session
Each browser session is represented in Weaver and may have associated attributes.
When a session is initialised the contents of the session/init section of the WAD file are executed. When a session is destroyed - for whatever reason - the contents of the session/destroy section of the WAD file are executed.
Session scoped values are accessed in the EL via the sessionScope:
In a scope attribute they are referred to using the value session:
And are available programatically via WeaverExecutionContext.getSessionContext:
In the WAD file the session-control tag is used in the dispatch section to control how sessions are handled. The session-control tag takes a single attribute called action with values as follows:
- init - If the session has not previously been initialised then the contents of the session/init tag are executed. If the session is already initialised then no action is taken.
- destroy - Causes the session to be destroyed and the contents of the session/destroy tag to be executed. You would only use this tag if you wish to explicitly destroy the session - in normal operation an inactive session will expire and the contents of session/destroy will be executed automatically.
- require - Requires that the current request is taking place in the context of an initialised session. Otherwise the contents of the session/time-out section are executed.
Let's look at storing the time of voting in the session - and stopping two votes taking place in the same session.
We'll modify our Vote W-Bean as follows:
We try to retrieve voteDate from the session. If it is present then a vote has already been made in the session and we set the message to the user appropriately. If voteDate is not present then the vote is allowed and the date of the vote is recorded in the session.
Despite my somewhat artificial example you will find that you often need to store per-session data in your applications and release it when the session is destroyed. For example I have a search application that stores the most recent query and hit list in the session.
The Application
When a WAD file/Weaver Servlet is (re)loaded the contents of the application/init section of the WAD file are executed. When terminated the contents of the application/destroy section of the WAD file are executed.
There are two attribute scopes that are relevant to the application:
- servlet - Servlet scoped values are available within a given WAD file and the W-Beans it calls - they are not available in the View.
- application - Application scoped values are available to all servlets in the application - that is all WAD files, all View components and all W-Beans within the context.
Servlet scoped values are accessed in the EL via the servletScope:
In a scope attribute they are referred using the value servlet:
And are available programatically via WeaverExecutionContext.getServletContext:
Application scoped values are accessed in the EL via the applicationScope:
In a scope attribute they are referred using the value application:
And are available programatically via WeaverExecutionContext.getApplicationContext:
Let's look at counting the number of votes made. There are many ways in which we could do this. For the sake of demonstration we'll do it without altering our W-Bean, really just to show another use of the EL.
We will store the number of votes cast in the application scoped variable called voteCount and modify thanks.jsp to display it:
In our WAD file we will initialise the count to zero on application loading and increment it for each vote cast:
As an exercise you could extend the above to store the running total in a file on application destruction and then reload it when the application is restarted. In this way the count would not be reset to zero every time that the application is restarted.
An Important Note about Usage
This is a brief note concerning the usage and structure of the WAD file and of W-Beans. The following comments may well be self-evident but I would rather spell things out than leave room for misunderstanding.
Typically there is not a one-to-one mapping between user events and W-Beans. You will often make calls on several W-Beans in order to service a single event. Conversely a given W-Bean may implement a group of related actions e.g. connect to database, search database, disconnect from database; and the various actions may be selected by passing an appropriate parameter.
The EL is capable of evaluating complex expressions. Often the selection of execution path/call of W-Beans is dependent on multiple values.
W-Beans should be written in a mind-set of processing inputs and providing outputs. The fact that the ultimate consequence is the display of a Web page should be irrelevant. The job of deciding what action to take is the responsibility of the Controller and the job of how to display the output is that of the View.
You should try to write generic W-Beans where possible - in this way they may be reusable in future applications. With the same goal in mind the operation of W-Beans should not be coupled - unless of course you are writing a library of W-Beans that are intender to work closely together.
Finally although the XML syntax used in the WAD file is powerful and flexible it should not be used as a general purpose programming language - its intended usage is to program the controller. If your WAD file becomes very complex you may reconsider which functionality should be implemented in the View, the Controller and the Model.
Extending the EL with Custom Functions
The EL used in the WAD file can easily be extended by adding your own customer functions, these functions then become an integral part of the EL.
To add a new function to the EL you need to:
- Write some Java code to implement your function.
- Load the function via a function tag in your WAD file.
An EL function must be defined as a public static member of a public class. We'll look at an example that will be used later in our discussion of authentication. The function takes two String parameters - a username and password. The function returns a Boolean value to indicate the validity of the supplied credentials.
Before the function may be called we must load it in our WAD file. This is done with a function tag inside the load-functions section:
The function tag takes attributes as follows:
- name - The name by which the function will be called in the EL.
- class - The fully-qualified name of the class that implements the function.
- signature - The declaration of the function as it appears in the class. The public and static keywords are omitted as are the parameter names and all class names are fully-qualified.
Once loaded, the function is then available anywhere an EL statement is legal in the WAD file.
For example we will soon see the following use when we discuss authentication:
The username and password parameters are passed to the checkPassword function and the when tag acts based on the returned value.
In the next section we'll discuss Weaver's support for authentication.
Authentication
Weaver has in-built and extremely flexible support for authentication. The approach taken is that you provide the actual logic for authentication and Weaver provides generic supporting functionality.
Typically a JSP page is used to collect credentials and a W-Bean or an EL Custom Function is used to determine their validity.
You define the circumstances under which authentication is required in your WAD file. Weaver then automatically handles the issuing of the security challenge when necessary and the resumption of execution on successful authentication. Execution is automatically resumed at the point in the WAD file that caused the security challenge to be issued. So, if the user was trying to reach our JSP page to cast a vote when the security challenge was issued, then they will automatically be taken to that page on successful authentication - with all request related state restored.
You can, should you wish, have multiple areas of authentication in your application - this is supported via a mechamism known as authentication domains. Authentication domains allow your application to be partitioned in to different security areas, each having their own authentication requirements. For example the Administrative Console has its own security domain, but once you have authenticated here it does not mean you have access to, say, secure parts of your application that have their own security domains.
Authentication is controlled in the WAD file using the auth tag. The auth tag takes two attributes:
- action - Selects the required authentication function, it may take any of the following values:
- required - If the session is not authenticated for the given domain then the current execution state is stored and the main/security section of the WAD file is executed. Usually the security section issues an authentication challenge to the user in the form of a login page.
- resume - The resume action is used after a successful authentication challenge. It causes execution to restart at the state stored by a previous required action and adds the given domain to those authenticated for the current session.
- add - The add action explicitly adds this session to those authenticated for the domain.
- remove - The remove action explicitly removes this session from those authenticated for the domain.
- domain - The name of the authentication domain.
Consider if, in our example, we wanted the user to authenticate before voting. First we write a function checkPassword that takes a username and a password, checks their validity and returns appropriately true or false. As described in the section on Adding Custom Functions to the Expression Language, this function is made available to the EL as follows:
Now we write a JSP page that displays a login form - two text input fields named username and password and a hidden field called event with value doCheckAuth that is used in the WAD file to determine that a login attempt is being made. In the WAD file we forward the user to our new JSP page from the security section:
Now we need to arrange for the user to be required to login and take to appropriate action depending on the validity of the username and password they supply. This is configured in the WAD file as follows:
The first when clause handles the submission of the login form. The choose inside this takes a different action depending on whether our checkPassword function returns true or false.
If authentication is successful we call the auth tag with a resume action. This causes execution to resume automatically at the point it left off when the security challenge was originally made. The user will be taken back to whatever they were trying to do when they were required to authenticate.
If authentication fails then we set the loginMessage attribute to an error message and send the user back to the login page. The login page displays the error message and gives the user an opportunity to try to login again.
But how do we actually indicate that parts of our application require authentication. In our example this is done in the otherwise section of the outside choice (usually where the main event dispatching goes on) with the auth tag taking the require action attribute. This will cause the security section to be executed if the current session has not been successfully authenticated for the declared domain.
Setting up authentication is probably the fundamentally most complex activity undertaken in the WAD file. However, given Weaver's in built support for storing state and automatically resuming after a successful security challenge, and its ability to partition authentication via domains the work in the WAD file is it is well worth the trouble. After you have written one application with support for authentication you have cracked it - the structures required in the WAD file become an easily reproducible cliche.
Next we'll take a look at how Weaver deals with errors thrown by your W-Beans.
Error Handling
Weaver is able to handle, in the WAD file, errors raised by W-Beans (that is WeaverClientExceptions thrown). The structure of the error handling tags is taken from JSTL. I am not wonderfully happy with the design - but have stumped for consistency with JSTL rather than for producing something arguably better but different.
In the WAD file we use the catch tag to trap any WeaverClientExceptions raised by its subtags. The catch tag takes two optional attributes that define an attribute where any exception thrown should be stored:
- var - The name of the attribute in which to store the WeaverClientException.
- scope - The scope of the attribute in which to store the WeaverClientException.
To handle (rather than to just ignore) an error you must check for the presence of the stored exception in your WAR file and take appropriate action - most crudely by forwarding to a JSP page that displays details of the error to the user. For example:
Next we'll take a look at the configuration files used by Weaver.
Configuration Files
Every Weaver application must have the following configuration files:
- WEB-INF/application/conf/application.properties - This is the global, application-wide configuration file, there must be exactly one per servlet context/application.
- WEB-INF/[servletname]/servlet.properties - This is a per servlet (equivalent to per WAD file) configuration file. There must be one of these for each servlet/WAD file.
These configuration files take the form of standard properties files.
For details of the standard settings contained in the configuration files please see the Reference Manual. You may, of course, add additional configuration values for your application.
Within a W-Bean values from the application configuration file are available from the ApplicationContext via the getConfigValue method.
For example:
Within a W-Bean values from the per-servlet configuration file are from the ServletContext via the getConfigValue method.
For example:
Note here how the name of required parameter is formed in the standard dot ('.') separated manner.
Bean Parameter Assertions
You will often find that your W-Beans need to confirm that certain values are present before they may proceed. Weaver provides a utility class, WeaverAttributeAssestion that is able to check:
- Presence of a named value in a given scope or in any scope.
- The Java class of the value.
- Whether a String value (the most common case in this situation) is from a given set.
Should an assertion fail then a WeaverClientException is thrown including an informative message.
Typical usage is as follows:
The first assertion declares that a value called var must be found in the Bean scope (that is must have been supplied via the param tag in the WAD file) and that it must be a String.
The second assertion is similar to the first but insists that the value of colour attribute is take from the values red and green.
Attribute assertions can be a great help during development but are an overhead in a production deployment. Attribute assertions may be turned on or off in the application configuration file (WEB-INF/application/conf/application.properties) using the following setting:
Please see the javadoc for a full description of the WeaverAttributeAssertion class.
A Note About the Deployment Descriptor and the Starter Application
As we have seen Weaver's starter application ships with a ready-made deployment descriptor (web.xml).
There are some parts of the deployment descriptor that are mandatory for Weaver and others that may be modified to suit your application.
The deployment descriptor shipped with the starter application is as follows:
I have added comments to the above to flag those areas you might choose to modify. You would modify them if you wanted to add additional servlets or wanted to change the servlet name myapp to something more meaningful.
Other Tags
We have already covered most of the core tags shipped with Weaver. You can see the full list in the Reference Manual. Those not discussed to date are:
- xparse - Parses an XML document into a DOM tree representation.
- xtransform - Applies an XSLT stylesheet to an XML document. This is primarily useful in transforming XML generated by your application into HTML to display in the user's browser.
- import - Includes other XML files in the WAD file. Each included file must be a well-formed XML document.
- out - The out tag sends output to the browser.
- remove - The remove tag deletes a scoped value.
In the fullness of time more tag libraries may be written - contributions are welcomed.
Next we'll take a look at the logging facilities offered by Weaver.
Logging
You may optionally use, in your W-Beans (and in other Model code), the same logging facility as used by Weaver itself. This has the distinct advantage that your logging may be controlled from the Administrative Console.
Weaver logging is implemented using Apache Log4j, for a detailed description of its functionality and of its configuration please see the Log4j web site.
Most simply, in your code you aquire a Logger object as follows:
The parameter to getLogger names a area of your application (often a package name). You may then enable and disable logging on a per-area basis. This facility is often useful to elimate the logs you don't need in order to more easily inspect those you do.
Once you have your logger you may use it as follows:
All of the above methods have a peer that takes a second Throwable parameter - useful should you need to log an exception.
On application startup, logging configuration is read from the application configuration file (WEB-INF/application/conf/application.properties) using the standard log4j properties.
The configuration as shipped with the starter application is as follows:
Logging settings of a running application may be modified via the Administrative Console.
Life Cycle Listeners
Life Cycle Listeners provide a mechanism by which W-Beans may be informed of session or application creation or destruction independent of any call made from the WAD file.
To be informed of application creation and destruction your W-Bean should implement the WeaverApplicationLifeCycleListener interface.
To be informed of session creation and destruction your W-Bean should implement the WeaverSessionLifeCycleListener interface.
Please see the javadoc for full details of these interfaces.
What Next?
You should now know all you need in order to begin developing applications using Weaver.
The following sources of information about Weaver may be useful:
- The Reference Manual.
- Javadoc of the classes used in application development.
- The Tag HOWTO - will show you how to add you own tags to those available in the WAD file.
- The Upload HOWTO - will show you how to handle file uploads from the user's browser.
- The From Source HOWTO - will show you how to build Weaver from its source code.
- The WBean Param Taglet documentation - will show you how to use the WBean Param Taglet to include WBean usage information in your Javadoc.
- Use the EMail lists to ask others for help.
- The Java, WAD file and JSP pages that make up the Administrative Console may prove illustrative.
- Javadoc of the whole of Weaver - should you wish to look under the hood.
- The source code to Weaver itself may be useful when tracking down problems, reporting bugs or extending functionality. A hyperlinked HTML version may be browsed here.
The following references contain related information:
- The Servlet Specification.
- The JSP 2 Specification (includes details of the EL).
- The JSTL Specification.
- Apache JSTL Home.
- Sun's MVC Blueprint.